I'm so excited to share with you a fun nail diy! First of all, I must apologize for the blurriness of some of these photos. Left-handed Lauren + right-handed camera does not always get perfectly in focus photos. These are probably my favorite nails yet and they're so fun and colorful! I can never keep polish perfect on my nails for very long though as I'm always running around doing random things, so I didn't get to enjoy them very long. After you get the hang of creating this design, it's fairly easy, though time consuming, but I always do it in front of the tv as a relaxing thing to do.
First things first, I'm starting to be obsessed with the Milani brand. I've made it my personal mission in life to own all of their neon laquers because they're so fun and bright. For this design I used the Fresh Teal, Pink Hottie, and Totally 80's shades, as well as their Yellow Whiz fast dry polish. The orange was gifted to me (and at the moment I don't recall the brand, but it's not very good). For the white I used another random polish that I can't recall the brand of. For the black I actually used a Prismacolor premier pen that I had laying around, which is so much easier than black nail polish and a toothpick. For a topcoat I used good ol' Milani again.
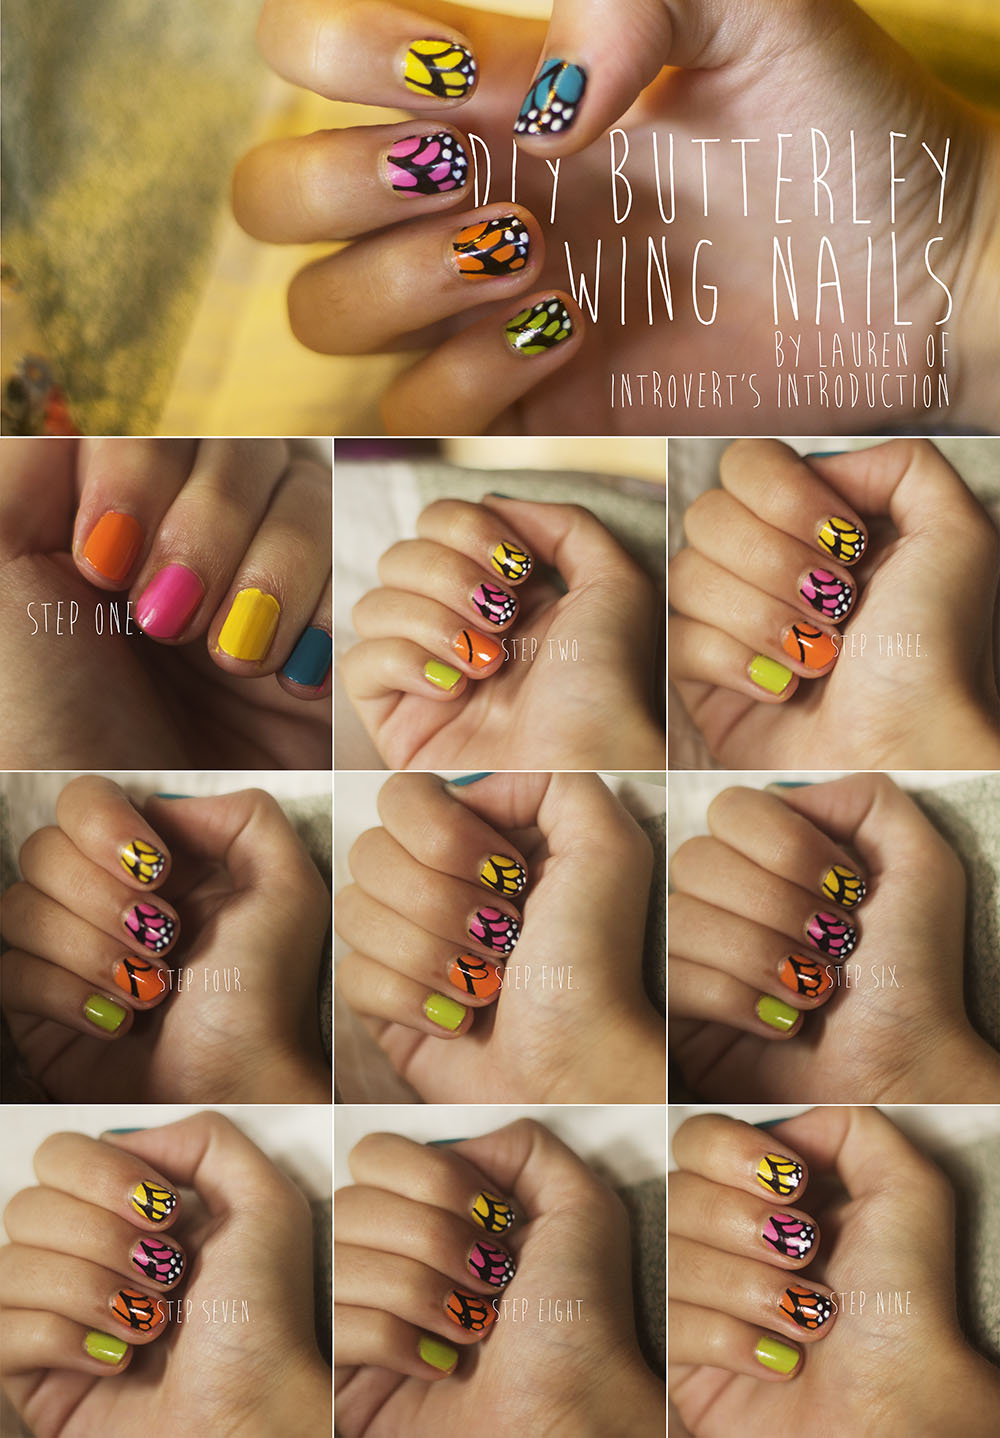
Step one: Base coat! First of all, I always paint a clear coat underneath my base color so as not to stain my nail. For a design as crazy as this, you just have to go all out with the color and paint every nail a different one. It's only fitting.
Step two: Draw a curvy line from the middle of your cuticle to about 2/3 down the side of your nail.
Step three: Then draw a smaller curved line down to about the halfway point on the opposite side of your nail.
Step four: Thicken the first line just a bit.
Step five: Then you'll add the next section of the wing by drawing a slightly crooked "U" shape.
Step six: Create two more "U" shapes, making each one just a little bit smaller.
Step seven: Following the connecting line of the last two "U" shapes, you'll draw a slight diagonal line to the 1/3 point of the remaining negative space.
Step eight: Then draw two curving lines on either side of the diagonal line.
Step nine: Fill in the remaining space, and add polka dots!
Step ten: Then simply add your top coat. If you go the sharpie/pen route like I did, there will be a bit of bleeding from the pen reacting with the top coat. Once the top coat dries, just touch up a bit on your color, add another top coat, and you'll be good to go!
If you have any questions about this tutorial, please don't hesitate to leave a comment or shoot me an email.
Have a great day!
No comments:
Post a Comment